It’s been said that “Every time a child says, “I don’t believe in fairies,” there is a fairy somewhere that falls down dead.” (James Matthew Barrie, Peter Pan)
Well we wouldn’t want that would we? Now I am not really into fairies per se, but I love gardening and I especially delight in all the wonderful metal obelisks, trellises and garden ornaments that can adorn one’s garden! So when I discovered a vendor’s fairy gardens last year at the Paris Street Market here in Littleton Colorado, I guess it was inevitable that I would create my own miniature gardens some day.
I decided that my three granddaughters just had to have fairy gardens! Here’s my first attempt.


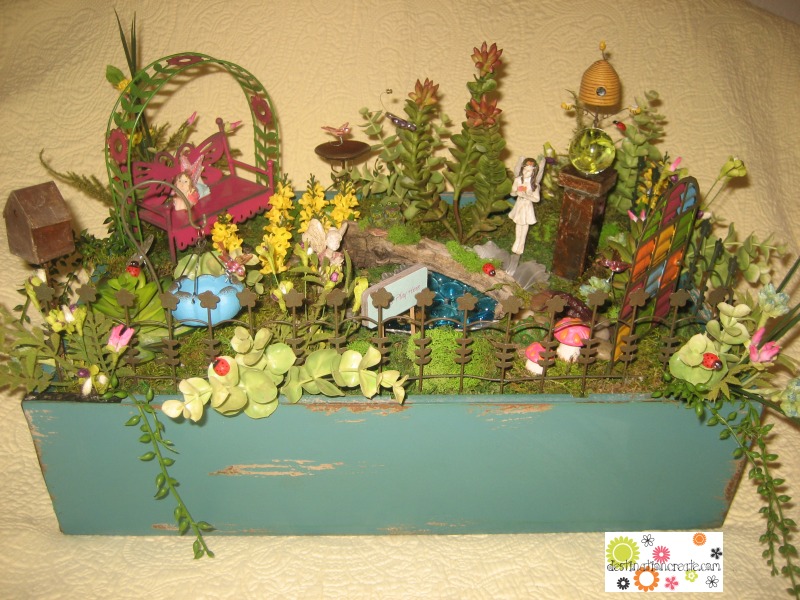
For my next attempt I decided to use a container that wouldn’t require so much effort to cover the floral foam in an open-work container. A trip to the thrift store yielded an Easter bowl with cute lines and fun color. The flowers and butterflies came from Ashland Collection Spring floral picks purchased at Michaels Crafts. The little arches, swings and fence were purchased from Hobby Lobby. Items like this go quickly at Hobby Lobby and aren’t generally re-ordered so grab some the first time you see them. I’ve learned that the best seasonal items at Hobby Lobby usually arrive in the earlier shipments.

I just love, love , love these colorful fairy garden ornaments in my third fairy garden below that are designed by Genevieve Gail and sold by Studio M/Magnet Works. I wish she designed human sized items for my human sized garden!


This next fairy garden was commissioned by a client for her three little girls. It was so fun to create!


Now one for me! All of the miniature gardens seen above incorporate plastic and silk plants that I purchased from Hobby Lobby. There is no way that little girls are going to keep plants alive, plus I wanted their gardens to be enjoyed indoors. I wanted live plants for mine and I wanted it large enough to have room for the turquoise gazebo from the Gypsy Garden Collection. A little red wagon was the perfect container.
Before

After

Make a gazing ball from a large marble. I found mine at US Toys. You could glue it to a golf tee if you don’t have a metal pillar. The little plastic turtles and frogs came from US Toys as well.


One of my little grandsons has requested an “Under the Sea” garden. Hmmm- I’ll need to think about that one…
Tips for making your own fairy garden:
- Gather a container that you like- an old garden pot, a shallow container, window box etc. You can also just plant the fairy garden right in the ground.
- If the container doesn’t have good drainage then put a shallow layer of horticultural charcoal in the bottom of the container followed by a shallow layer of pea gravel.
- Fill the container with good quality potting soil
- Plot out where your plants will be and perhaps a pebble path or pond. Create a path from small pebbles, broken glass, tiny tiles.
- Put your plants in and then place your miniature garden accessories, furniture and fairies. There is a line of diminutive plants at my local garden center labeled “Fairy Garden” that are very fun, but a bit pricey. Look for steppables, ground covers,creeping thymes, mosses, small herbs, angel vine, miniature roses,ferns and small grasses. Buy the smallest plants you can find. This first year will be an experiment to see which plants do well outside in a shady spot. I also tried a small fuchsia and lobelia, both of which have not done well so far.
- Water, then place in a bright spot indoors or a shady spot outside. Don’t over water, especially if your container has no drainage holes. depending on where your garden is you may only want to water every 2-3 days.
- Another option of course is to use bits of permanent plants instead of live plants for a low maintenance or kid-friendly garden. If you go this route, fill the container with dry floral foam blocks cut to fit about an inch below the rim of your container. Cover the foam with sheet moss or moss mat/runner. I used the moss runner from JoAnn Fabrics. I used floral greening pins to attach moss to the dry foam. I also hot glued bits of reindeer and mood moss to add interest and more texture.
- Smile and enjoy the magic!
Sources I used:
- http://fairygardenstore.com
- http://factorydirectcraft.com
- my local independent garden center

Hi there you have a great website over here! Thanks for posting this interesting information for us! If you keep up the great work I’ll visit your blog again. Thanks!
Great job with the Gypsy Garden line! LOVE this!!! Thanks for sharing :)
I’m so glad you took a look!